To contact us Click
HERE

Yesterday was a glorious day here in Grand Rapids, Michigan. Our beloved Farmer's Market opened again for the 2012 summer season. And this year was also a 'grand opening' of a new and expanded marketplace. It was pretty exciting just to see the mounds of people electrified about fresh locally farmed food. My mouth was watering just looking at the buttery asparagus and my nose tingling with happiness with the scent of fresh and growing herbs and other vegetable plants. It was a pretty great day to be in Grand Rapids. I bet many of you have had similar experiences this past weekend with opening market's or maybe you have been blessed to enjoy a year-round local farmer's market. In Michigan, with our four distinct seasons, it is easy to have significant starts and ends to the year and the first weekend in May is kinda an unofficial start to the summer with the beginning of our cherished farmer's market.

Last night we ate a few pounds of roasted asparagus (I think I ate a pound just by myself!) and today I was excited to make a few special treats with some fresh rhubarb. Oh, I wish I had some wild growing asparagus and rhubarb growing in my backyard. I think I will have to investigate how to make that happen for me someday :) In the meantime, I love supporting my local farmers that bring their bounty to sell to the city-folk like me.

It was also a busy weekend in my own backyard garden. I planted many seeds. Zucchini, Cucumber, a few different squashes, lots of herbs, lettuce, kale, and a few different beans and peas. It was a dramatic start to our doubled-in-size garden. We plowed another 28 x 22 plot in out backyard to plant more. I think our urban neighbors think we are a bit silly (and maybe we are!), but it has become somewhat a hobby as well as a way to learn to grow and eat food from our own sweat and land.

I would encourage you to try and grow something this summer, even if it is just a little mint plant in a pot on your window sill for home brewed tea. Or investigate back porch or container gardening if you do not have the ground space. Or I have heard a great deal of love for square foot gardening as well. Either way, it is worth trying and experiencing the joy, disappointment, tears and fulfillment in growing your own food. It seems like you are a bit closer to God, or heaven, or at least how God intended it to be.

And with all that fun in the garden this weekend with a fair share of rain, sun and humidity), we were all in agreement about a yummy baked treat. And since rhubarb has made her spring debut in our house, we made oat bread with rhubarb, plus a little rhubarb butter to spice it up. This recipe is based off of my basic gluten-free oatmeal bread. Delish!
 Rhubarb Oat Bread Recipe (gluten-free, vegan)
1 cup of certified gluten-free rolled oats (I used Bob Red Mill's)1 1/4 cup of boiling water2/3 cup of non-dairy milk (I used So Delicious Coconut Milk)2 TB of fresh lemon juice (juice of 1 lemon or sub apple cider vinegar)
In a medium bowl, pour the boiling water over the rolled oats. Let sit for a few minutes and then add the milk and lemon juice. Continue to let sit for 5-10 more minutes until the oats are soft and you can see some cultured milk and water from the lemons. Then mix with the following ingredients...1 cup of freshly ground buckwheat flour1/4 cup of chia seed meal1/2 cup of freshly ground GF oat flour1/2 cup of tapioca flour1 ts of baking powder1 ts. of baking soda1/2 ts. of sea salt1/2 cup of sucanat (or your preferred sweetener)1/3 cup of baking oil: grapseed, melted coconut oil or light olive oil1 ts. of pure vanilla or 10 drops of pure vanilla stevia liquid (I used NuNatural's)
1 heaping cup of finely chopped fresh rhubarb
 In a large mixing bowl, mix all of the dry ingredients with a whisk. Then add the wet oat mix and the oil. Mix well and let the batter sit for just a few minutes to soak up the moisture. Lastly, add the finely chopped rhubarb and mix well together. Then pour the batter into a well oiled bread pan and top with a sprinkle of dry gluten-free oats. Then put in a preheated 350 degree oven and let bake for 45-55 minutes. Check then to see if the bread is baked through in the middle, if not, let it continue to cook for 5-10 more minutes until it is not gooey and golden brown.
Pull from oven and let cool at least 15 minutes before pulling from pan to let it cool on a grate or plate. This bread will make between 12-15 slices depending on how thick you like to cut each slice.  Serve bread warm with a touch of vegan butter or fruit butter. I made some rhubarb butter to add a nice tart touch. The simple recipe is below.
 Honey Rhubarb Butter Recipe
1 cup of washed and chopped rhubarb1 TB of water2 TB of raw honey1/2 ts. of ground cinnamon1/4 ts. of ground cloves
In a small sauce pan, cook the chopped rhubarb with the water until the rhubarb turns to a thick mush. This takes about 10-15 minutes on medium heat. Then pull from the heat and add the honey and spices. Then let cool and place in a high speed blender. This recipe is a very small amount, but is intended to be doubled or tripled depending on your amount of rhubarb. Store in a mason jar in the fridge for up to 2 weeks, or preserve using traditional canning methods.
The perfect spring-time bread recipe. And, this bread does not contain too much sweetener, so if you want it make it more a sweet bread then add more sucanant. I wanted this bread to be a bread that could easily be toasted and topped with honey or rhubarb butter for the extra sweetness.

Good to the last bite! I hope you enjoy and find joy and excitement this spring with added growth and life!
Much love as always!


 Happy Mother's Day, to all of you mothers out there! I think I have more respect, love and thankfulness for mothers since becoming a mother myself. Especially for my own mother of five children and also for all the many many moms I have witnessed their sacrifice and love over the years.
 I think that being a mom means that you understand the tension between the simplicity and complexity of life. We get to experience the simple heart of our child and yet know that life, growth and love can some times be so complex there are no words. We can ache and have joy in the same emotion. Being a mom has been one of the greatest gifts I could ever ask for.
 Now that's a perfect bite. A slice of strawberry, a slice of banana and a slice of pancake. All kissed with a gentle touch of raw honey and lemon. Hmmmm, good. Love, love, love!
 Whole Grain Pink Berry Pancake Recipe

 Cupcakes, oh my! I have made hundreds of cupcakes and even a few cakes over the past few months for many close friends for birthdays and parties and such. So, again, I was recently asked to make a few dozen cupcakes for a local volunteer appreciation event. I of course said, yes! And, decided that I would make things easier on myself and make the cupcake base from my favorite gluten-free baking blend company.
 That company: Namaste Foods. It is a great place to start when you are a new at the gluten-free (and even dairy-free) journey. They give you lots of amazing options, and you can find them at most local grocery stores or can easily buy online at Namaste Foods or Vitacost (get free $10 coupon HERE). They also use some of the "better" baking ingredients, using dehydrated cane juice for sweetener and not using any other junk or fillers. I love that! I have made this mix many times and I am sure you have heard me talk about them before, and especially the chocolate cake mix will easily trick any by-passer to think that for sure they are not eating a gluten-free dessert! It is that good (and easy!)
 I'm no genius, but I bet some of my from-scatch gluten-free vegan cupcakes may be a bit intimidating for the beginner gluten-free friend. Mixing flours and finding new ingredients can be a little stressful in the beginning. It takes time friends! Don't fret too much, but yet, you still want to make something special for the upcoming birthday, party or special gathering. This recipe is just for you then! It is super simple with the gluten-free flours already mixed and you can make your cupcakes just as simple as putting together a 'box mix'.
 So my next few posts will be some cupcake recipes for beginners with the help of Namaste Cake mixes. I added some ingredients to the mixes to make them a little more than generic and with a little more sparkle. My next Namaste cupcake recipe will be Strawberry Shortcake with the Vanilla Cake mix, so stay tuned for a few more recipes as well.
 But, let's just enjoy this recipe shall we. Decadent. Lots of coffee chocolate flavor and lots of roll-your-eyes oooing and ahhing. Seriously. Top with a little mocha cream frosting and some chocolate or coffee bean shavings and you are in heaven!
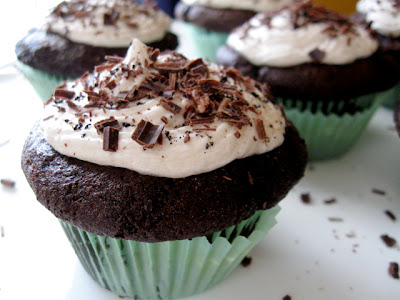
 Chocolate Mocha Cream Namaste Cupcakes
  I topped my cupcakes with a little frosting, shaved chocolate AND ground coffee. Perfect. If you want to avoid powdered sugar you can use a honey-based frosting here, and just add a touch of coffee or cocoa/chocolate for flavor as well.
 As promised, a recipe for strawberry shortcake cupcakes. Viola! This recipe is a super simple recipe for any gluten-free friend, but especially for the beginner because it uses the fabulous Namaste Vanilla Cake Mix as the main base ingredient. Who can resist a sweet strawberry treat this time of year?! Not me!
 Pretty in pink and perfect for an early summer treat. Or perhaps this is just the gluten-free treat you are looking for that Memorial Day celebration coming up in a few weeks. 'Wow' your friends and family with a special treat like this and I promise you will be every one's new [gluten-free vegan] best friend. In my last post I mentioned some of the great reasons why I would choose Namaste Food's Cake mixes to make some quick cupcakes, but did I mention that the mixes are also budget friendly too?!
 Then you can have the most fun in the decorating process and forget the stress in baking in the first place. And working with gorgeous red strawberries makes is really really easy! Hmmmm, love at first sight! Am I right?!
 Strawberry Shortcake Namaste Cupcakes
 P.S.I hope you try your hand at making some gluten-free cupcakes, especially as easy as these. And, if for some reason you rather have someone like me do the job for you (and you live locally!) I would love to make some cupcakes or cake for your special birthday, gathering or party. Really! I am starting to do this more and more and have been loving it. So if you or a friend is interested in hiring me for your gluten-free cake or cupcakes for your special event, then please let me know! I would love to do the job!