17 Şubat 2013 Pazar

Apple Pie : Baking Partners Challenge #6

To contact us Click HERE
Baking Partners # 6: This month we had been challenged to make pies.We had a total of four recipes both sweet & savory recipes.The recipes were suggested by Tamy @ 3sides of crazy,Gayathri@ Gayathri's Cook Spot, Samantha @ Samantha Menzies.I selected the apple pie recipe suggested by Gayathri@ Gayathri's Cook Spot,suggested from taste.com.Thanx Gayathri for the lovely recipe.I have made a slight change in the recipe by skipping the egg in the crust and added only egg white for the final brushing.As I was baking pies from scratch for the first time ,so took the simplest one to prepare.The second reason of selecting this was that my kids loved sweet pies so I knew savory ones wouldn't be preferred much;though I like savories.Will try out the other ones sometime later.This pie has a puff pastry kind flaky crust and the apples are tender and juicy with the flavors of cinnamon.We all just loved each bite of the pie.Do give this a try and you'll definitely fall in love with this pie,a great way especially for kids to sneak in apples too !!!


Ingredients
all purpose flour 1 3/4 (260 gm)cup
self rising flour 1/2 cup(75gm)
unsalted chilled butter 185 gm or 1 1/2 stick cut in small pieces
chilled water 1/4-1/2 cup
salt a pinch
to brush the top
caster sugar
egg white 1
milk 1 tbsp
for filling
granny smith apples 8
lemon juice 1-2 tbsp
unsalted butter 45 g(approx 1/2 stick)
caster sugar 1/2 cup(110 gm)
cinnamon powder 1 tsp
ground cloves 1/4 tsp


Method

Step 1: Making the dough(The dough is similar to the puff pastry sheet dough)
Sift the flours together ,add salt in a large mixing bowl.Add the cubed pieces of chilled butter and rub lightly into flour with your fingertips.Lift mixture high above the bowl as you rub, to incorporate air into the pastry and make it lighter. Continue until mixture resembles fine breadcrumbs, then stir through sugar. Add the chilled water, then drizzle over flour mixture. Start to bring the dough together by cutting the liquid into the dough with a blunt knife.Place it over the counter top and bring the dough together to form a ball with your hands, adding a little more water if necessary.There will be chunks of butter seen here & there but that's quite normal.Divide dough into two pieces, one slightly larger than the other.Flatten the balls in disc shapes of 5" diameter,wrap in plastic wrap and chill for 30 minutes.


Step 2:Making the filling
To make the filling, peel and core the apples, and cut each into eight to ten pieces. Toss immediately with lemon juice in a large bowl, to prevent apples from discoloring. Place the butter and sugar in a large non stick pan over medium-low heat.When butter has melted, add apples and spices, then stir to coat. Cook, stirring occasionally, for 10 minutes or until apples have softened and the sauce is thickened Set aside to cool.


Step 3: Rolling out the pie crust
Roll out the larger pastry ball on a floured counter top to a 30 cm circle (about 2mm thick). Roll pastry around rolling pin,brush off any excess flour beneath.Then unroll over a 22 cm(8 3/4" pan) metal pie dish/aluminium foil tray.Gently press into corners and trim off the excess from the sides using a sharp knife.Beat the egg white with milk, brushing some on rim of the base. Place filling in base with a slotted spoon.Roll the small pastry piece to a 25 cm circle.Top it over the filling,covering fully,tuck in the excess sides under the base sides.

Step 4 : Final assembling & Baking
Crimp edges of pastry together with your fingers or make indentation using your knuckles to give a good pattern at the sides or else use a fork.Brush the remaining egg white on top and rim.Chill for 30 minutes. Preheat oven to 180°C, place pie dish on a baking tray. Brush top of pie with more beaten egg, sprinkle with caster sugar.(I haven't sprinkled the caster sugar on top) Cut four-five small air vents in the center of the pie and bake for 45 minutes or until golden brown.Mine was done at 48 minutes.Cool on wire rack and leave to cool for 2-3 hours so that the sauces thickens and is ready to cut,serve !!!


Servings ~ 1 pie of 22 cm(8 3/4 ")

NOTES
* Flattening the balls in disc shapes makes it easier to roll later after chilling.
* Use chilled butter always.If you're using salted butter,you can skip the pinch of salt in flour.
* Use chilled water to bring the dough together.
* Don't try to get a smooth dough,instead get a rough ball and refrigerate often to prevent the butter from melting.This will give a flaky crust when baking.
* If you wish to bake the pie using eggs,you can mix one egg  with 1 tbsp of chilled water and add to the flour.
* You can store the pie at room temperature for 2-3 days.
* I have taken a few tips from this video too.


Linking this to Baking Partners an effort by Swathi @ Zesty South Indian Kitchen :-)

Baking Partners


Check out to see other baking partners have baked,if interested :)

French Macarons : Baking partners Challenge #7

To contact us Click HERE
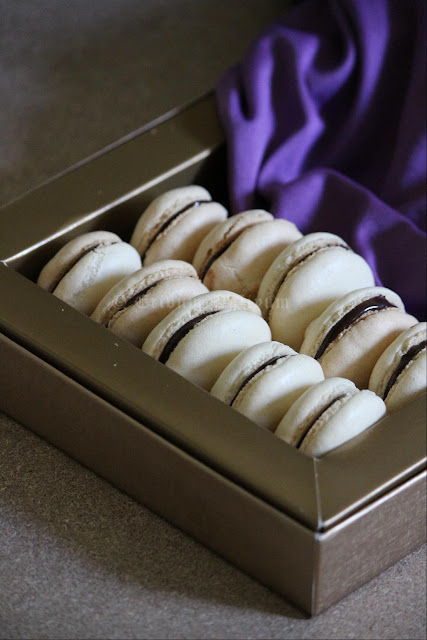
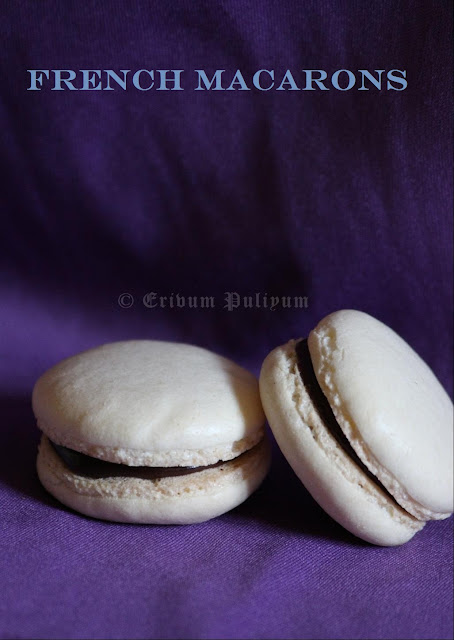
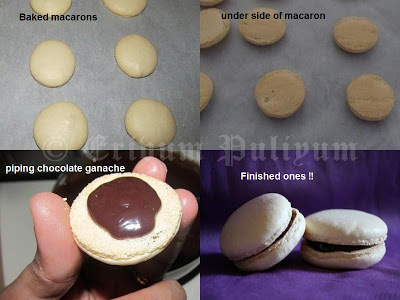
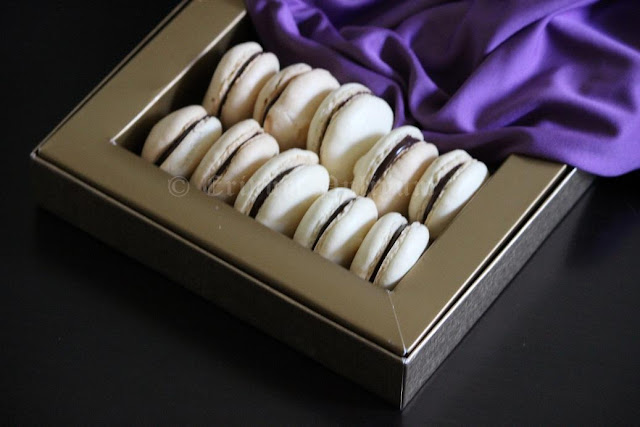
Baking Partners # 7 comes with a very tough challenge of baking Macarons.The recipe was suggested by Swathi @ Zesty South Indian Kitchen & Vidhya @ A Portion to Share.They had given a detailed recipe with 2-3 articles on trouble shooting problems while making macarons.Though I tried coconut macarons but this was a lot more tougher and trickier than that.Reshmi@ Easy Cook had been the first to bake these and she shared the tips to make these.And Swathi & Vidhya kept the group's morale high by their tips and ideas too.I started off baking these with my fingers crossed,and prepared it in a stage by stage steps.First kept the egg white for aging,then blanched almonds,powdered it fine and finally made these,in fact conquered it in my first bake.I haven't added any color or modifications as I wasn't sure of the outcome.Sandwiched them with chocolate ganache.This was a very good learning experience with all the trouble shoots highlighted by my fellow bakers and could understand better about macarons.I really donno know if I could get it right if I try again and similarly you guys too don't lose heart and its just a matter of the correct way of doing it.Do try & enjoy making these at home !!!!


Ingredients
for macarons
icing sugar/confectioners sugar 1 cup(125 g)
almond flour 3/4 cup (75g)  *refer notes
egg whites 2 large or 60g/60 ml
pinch of cream of tartar/a pinch of salt
super fine sugar 1 tbsp + 1 tsp (20g)

for chocolate ganache filling
semi sweet /bitter sweet chocolate 8 oz(227 g)
heavy whipping cream 3/4 cup(180 ml)
unsalted butter 2 tbsp


Equipments /accesories required
pastry bag
round tip 1/2"
parchment paper
flat cookie tray


Method
  • Age the egg whites- Keep the separated egg whites in a bowl.Cover it with a towel and leave for 3-5 days.I left mine for 3 days and leave it at room temperature for 12-24 hours before you actually start off with the making.
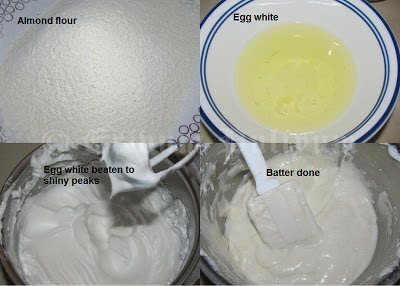
  • Pulse the almond flour and confectioner's sugar until combined.Sift this mixture two times.
  • Whisk the whites in a medium bowl until foamy.Add a pinch of salt and whisk again until soft peaks form.Reduce speed to low and add the superfine sugar.Increase speed to high and whisk until stiff peaks about 5 -6 mins.Sift flour mixture over egg whites,combine the mixture until it is creamy,smooth and shiny.

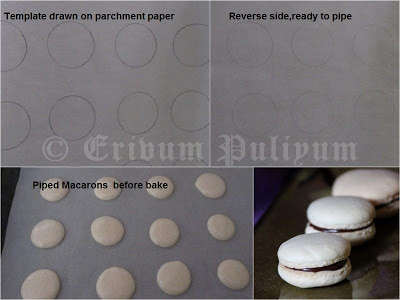
  • Preheat oven to 375 degrees F and line a tray with parchment paper.Draw a 1 1/2 " round templates on the tray  using a pencil if you are not a good piper like me,leave 1" space in between.Turn the parchment paper and use the other side(you can still see the template below)

  • Transfer the batter to a pastry bag by placing the pastry bag in a glass and pipe 3/4" round on the templates leaving 1" space on the lined parchment tray dragging the pastry tip to the sides of the rounds so that peaks don't form.(Hold the pastry bag at 90 degrees angle)
  • Tap bottom of each tray several times to release trapped air.Prick with a tooth prick rto release any bubble formed on top.Let it stand at room temperature for 15-45 mins or more.(Depends on the weather,humid condition-a simple check is until they form a thin film on top and they are no more tacky to touch)
  • Reduce the oven temperature to 325 degrees F,place the tray to bake one at a time rotating half way through until macarons are crisp and firm.(about 10-12 mins) mine was done at 10 mins.After each batch,Increase the oven temperature to 375 degrees F for 5 minutes and then reduce to 325 degrees F before placing the next batch.

  • Remove from oven after bake & let macarons sit on baking paper for 2-3 minutes.Then transfer on a wire rack after releasing from sheet.If macarons stick spray water underneath the parchment paper.Steam will help to release macarons.
  • Separate out in pairs the same size cookies and keep ready to sandwich with your yummy filling.(I filled mine with chocolate ganache,recipe follows)
  • CHOCOLATE GANACHE :Heat the cream and butter together in a heat proof bowl in a microwave on high for a minute or place in a medium sauce pan and bring to a boil on medium heat.immediately pour it over the chocolate and let it stand without stirring for few minutes,stir gently without incorporating air into the mixture until smooth.Let it thicken for about half an hour at room temperature.then can be transfered to a piping bag and piped into the macaron shells.(I piped it a bit early and so the filling start oozing out from some macarons.)
  • Refrigerate for 24 hours before you taste them as the flavors are incorporated best and the cookies are matured.The filling melds with the macaron cookies after 24-48 hours to give it a nice texture. Let them come to room temperature before serving.


NOTES
* How to make Almond flour at home- Soak the almonds(about 1 cup) in boiling water for 5-10 mins and blanch the skin using your fingers.Spread it on a clean paper towel/cloth.Leave to dry up the moisture  about half an hour or leave aside a day.Pulse the almonds in the blender until coarsely powdered or until it starts to stick to the blades.Remove from the blender and spread it in a tray.Place it in a pre heated oven to 250 degrees F and remove every 5 minutes,stir and place again without any change in color.Repeat atleast three times until the coarse powder appears very dry.Then blend again in the blender,until powdered.Sieve the powder to get fine almond flour.Measure the 3/4 cup and keep aside.(I refrigerated until further use)
* Store brought egg whites doesn't work good to make macarons.It is always good to separate egg whites from yolk and use.
* Always use stainless steel bowl for whipping egg whites and clean the bowl with a dash of white vinegar to remove any crease of butter/oil otherwise it will not work good.
* Refer this link for the trouble shoot problems while making these.The link is here & here.
* If the oven temperature of 375 degrees not working,then you can preheat and bake at 325 degrees too.
* Popular choices for filling are swiss buttercream frosting,lemon curd,dulce de leche,chocolate ganache,jam.

 
Linking this to Baking Partners an effort by Swathi @ Zesty South Indian Kitchen :-)
Baking Partners 

Chicken Bean Rice Bowl Recipe ( Mexican Style)

To contact us Click HERE
Mexican cuisine is a style of food which is primarily a fusion of indigenous Mesoamerican cooking with European especially Spanish.This is a very famous recipe and this is preferred and loved by us whenever we dine in mexican restaurants.This is a quick fix if you have all the ingredients ready before hand & serves a complete meal too.It has all the richness of vegetables,chicken,cheese,rice,black beans & sour cream.Do check this out if you haven't tasted it yet and give it a shot !!


Ingredients
to marinate
chicken breast 2 cubed
pepper 1 tsp
paprika 1/4 tsp(optional)
lime  1
salt
extra virgin olive oil 2 tbsp

layering
white rice / brown rice 2cups cooked
black beans 1 can drained/cooked
corn kernels frozen 1cup
roma tomato 1 chopped fine(refer notes)
onion 1/2 chopped
romaine lettuce 1/2 cup sliced(refer notes)
cilantro 3-4 sprigs
salt to taste
pepper 1/2 tsp/chile peppers 1-2
ground cumin 1/2 tsp
lime 1/2

toppings
sour cream 1/2 cup
guacamole 1/2 cup
cheddar cheese grated 1/2 cup


Method
-Wash & clean the chicken cubes under running water.Keep aside to marinate with the ingredients listed  except oil.
-Pre heat oven to 350 degrees F and place the cubed chicken as a single layer.Pour the olive oil on top.
-Bake in the oven for 10 minutes each side or until chicken is cooked & done.
-Cook the rice as per the packet instructions,drain water & keep aside.
-If you are using canned beans,drain & use.OR Soak the beans overnight & cook the beans with enough water & salt until done.Drain water or mix lightly with beans,keep aside.
-thaw the corn and cook in microwave on high for 3 mins.
-Chop tomato,onion,peppers,cilantro,lettuce,salt,ground cumin & lime juice.
-Layer the rice ,followed by black beans and chicken,then add the vegetable mix.
-Garnish with sour cream,guacamole & grated cheese.


NOTES
* I used grape tomatoes for the salad.
* I haven't used romaine lettuce sliced,but you can use that as its popularly used.My kids just pick it up and separate it out.Instead I used baby spinach leaves & dried cranberries,we loved that.
* You can use chile peppers instead of pepper powder with onion & tomatoes.
* I have used enriched white rice.You can use brown rice too.
* You can even serve a plate of tortilla chips if desired along with this bowl.
* If you wish to have an option for sour cream,try a mildly sour thick yogurt,works great too.


Linking this recipe to Flavors of Cuisines-Mexican hosted by Jannet (love to experiment)@ My Food Treasures


{DIY Valentine's Decor...Crochet Heart Garland}

To contact us Click HERE
Hi friends! I hope you've had a fabulous week! Things have been pretty quiet on the blog the last few days, but I'm back to share a super cute garland I made for our mantle!
 I just love how it came together!  I tried A LOT of heart tutorials before finding one that I really liked. This was the clear winner. You can find it HERE.  I used a mix of traditional Valentine's Day colors and threw in some non traditional colors too like gray and turquoise. I also used two different sizes of hearts in the garland to mix things up a bit. Each heart is stitched onto the garland at two points making sure they are secure. I've seen some garlands that just have hearts strung on a length of yarn, but I like this method better. You can find the tutorial for the chain HERE.  I plan on using this sweet thing for years to come!{Hearts On A Chain Crochet Heart Garland}
Love it, but don't' want to make your own? Well you're in luck because I have 10 listed in the shop! Hurry and snag one before they're gone!
Happy stitching friends!
Elizabeth
Pin It

S'Mores Granola Bars

To contact us Click HERE

Granola bars are my favorite grab and go snack and you really can't get any easier than this recipe. I love the Quaker Chewy S'mores Granola Bars, so I tweaked the recipe to be as s'mores like as possible. I used Kraft mini marshmallows, they taste like the marshmallows in Lucky Charms, or the kind that come in those little packets of hot cocoa, so they were perfect for these bars. The finished product was quite similar to the Quaker bars, but a bit chewier and more chocolaty tasting. Definitely a keeper. 
No bake S'mores Granola BarsAdapted From laurenslatest.com1/4 cup butter
1/4 cup honey
1/3 cup packed brown sugar
2 cups quick cooking oats {not rolled oats!}
1 cup crispy rice cereal
1/2 teaspoon vanilla
1/4 cup mini chocolate chips, plus more for topping
1/2 cup mini marshmallows, plus more for toppingMix together Rice Krispies, oats, 1/2 cup marshmallows, and mini chocolate chips (if you want them with less chocolate flavor, leave out the chips till the end). Set aside. In a small pot, melt butter, honey, and brown sugar together over medium high heat until it starts to bubble. Reduce heat and cook for another two minutes. Stir in the vanilla. Remove from heat and pour over oat/rice mixture. Mix well ensuring that all ingredients are moistened. Line a small jelly roll pan (12x8x1) with aluminum foil.  Pour mixture into lined pan. Pack it in really tightly or the bars won't set and will fall apart when cooled.  Sprinkle the top with more chocolate chips and mini marshmallows. Let cool, then cut into bars. Have a sweet day! 

16 Şubat 2013 Cumartesi

Brownies with Red Velvet Cheesecake Frosting

To contact us Click HERE
Red Velvet Cheesecake Frosted Dark Chocolate Brownies
TheseDark Chocolate Brownies with Red Velvet Cheesecake Frosting can’t be beat ifyou want a decadent dessert this Valentine’s Day.  They’re so luscious that no one would everguess they’re gluten free.  And I usedthe Apple Butter from the last blog post for this recipe.  You won’t what the apple butter adds.  You won’t be able to put your finger on itbut there’ll be an almost imperceptible hint of warmth and sticky density thatthe apple butter is going to bring to this intense brownie experience.   

 
Dark Chocolate Brownies with Red VelvetCheesecake FrostingPrep time: 10 min
Bake time: 35 min
 
BrownieIngredients·        3.5oz intense dark chocolate, chopped
·        ½cup butter, sliced into pieces
·        1½ cups sugar
·        1tsp vanilla
·        ½cup apple butter
·        3eggs
·        1cup gluten free bisquick
·        ½cup unsweetened cocoa
  

RedVelvet Cheesecake Frosting Ingredients·        16 oz cream cheese
·        1 stick butter
·        2 cups of powdered sugar
·        1 tbsp cocoa sifted
·        5-10 drops red food coloring depending on thecolor you want
·        1 tsp Vanilla
 
Video Tutorial

  Instructions for the Brownies 
1.    Preheat the oven to 350°F (or 175°C) and line a 9x9 inch or 7x11 inch pan with parchment paper sprayed withnonstick spray.
2.    For the brownie batter add the chocolateand butter to a microwave safe bowl that’s large enough to mix the entire batch,then microwave it on high 1-2 minutes depending on your machine.  But you’ll have to stop the microwave every30 seconds and stir in between each session.
3.    Once you have the chocolate andbutter well mixed stir in the sugar, vanilla, apple butter, and eggs then blendit all together until you have it nicely combined.  The batter will already look pretty thick evenbefore adding the dry ingredients yet. 
4.    Switch over to a rubber spatula, addthe dry ingredients to the bowl, and stir together the wet and dry ingredientsuntil you have it well combined.
5.    Pour the brownie batter into the preparedbrownie and spread it out evenly then bake them in a preheated 350 degree ovenfor 35 minutes. 
6.    When you remove them from the ovenallow them to cool to room temperature before refrigerating to chill completelyfor a few hours.
 
Instructionsfor the Frosting  
1.    Using a stand mixer with the paddleattachment cream the softened butter and cream cheese until well combined. 
2.    Add the vanilla sifted cocoa powder,and confectioner’s sugar and mix until smooth and creamy. 
3.    Add as much red food coloring as youneed to get the red velvet shade that you’re happy with….I used about 10 dropsbut mine was a little light.
4.    Load the icing into a piping bagwith a large star tip and pipe on as much frosting as you want.
5.    To see the chocolate decorationsbeing piped onto the parchment paper, watch the video tutorial. 
 Notes: Make sure the brownies are really chilled before slicing tomake it easier to get nice neat slices which might just be the hardest part ofthe recipe.  I used a serrated knife toslice this batch.  Sometimes I put thebatter right into cupcake liners filled just under the half full so I don’thave to slice them at all.

{DIY Valentine's Decor...Crochet Heart Garland}

To contact us Click HERE
Hi friends! I hope you've had a fabulous week! Things have been pretty quiet on the blog the last few days, but I'm back to share a super cute garland I made for our mantle!
 I just love how it came together!  I tried A LOT of heart tutorials before finding one that I really liked. This was the clear winner. You can find it HERE.  I used a mix of traditional Valentine's Day colors and threw in some non traditional colors too like gray and turquoise. I also used two different sizes of hearts in the garland to mix things up a bit. Each heart is stitched onto the garland at two points making sure they are secure. I've seen some garlands that just have hearts strung on a length of yarn, but I like this method better. You can find the tutorial for the chain HERE.  I plan on using this sweet thing for years to come!{Hearts On A Chain Crochet Heart Garland}
Love it, but don't' want to make your own? Well you're in luck because I have 10 listed in the shop! Hurry and snag one before they're gone!
Happy stitching friends!
Elizabeth
Pin It